Bombo’s Borgar – HAW GameJam 12 Winner
I participated in the HAW GameJam 12, we tried making games over a weekend! The Theme for the Game Jam was „Combine“
Here is the link to the Game Jam and all of it’s submissions!
And we succeeded! In fact, we even won in every category!
you can play the game on itch, or, even here in the browser!
Credits
| Illustration | Kyo | itch.io , Instagram |
| Illustration | *Spacebirblizzy* | itch.io , Instagram |
| Programming | Ben Krüger | itch.io , Twitter |
| Programming | Erek | itch.io |
| Music + SFX | ViktorZin (it’s me!) |
Making of
I decided to write up a „Making Of“ of the audio for the game.
I had some doubts before entering the game jam. I went alone, so had to find and join a group there.
I wasn’t sure that I could write music, because I was halted once before. I tried to stream my writing process on twitch multiple times, but could never come up with anything. Once I turned the stream off I was able to write stuff immediately. I was unsure if I could even work with so many people around me, but hoped for the best.
Making the Music
A cutesy game needs cutesy music. Of course I thought of Animal Crossing and Stardew Valley, and other similar games. Although the game is cutesy, it’s not really relaxing, there are time limits, you have to focus on the order and the button combos, it’s a bit stressful. So the music should be upbeat, and not too slow.
The Game is set in a cafe, so my initial thought was some kind of jazz. Bossa Nova came to mind, but it had to be more upbeat. I listened to some songs in the Jazz Fusion genre, as I felt that it was quite fitting to the game. I was also somewhat familiar with the genre. I sent some example songs over to the team, and they all liked the direction. A Spotify Playlist was created, and I kept listening to spotify’s suggestions, and added more songs to the playlist. Now I had a good reference pool.
here is the playlist by the way!
Gear
I brought my Laptop, my Line6 Helix Floor pedal that I also used as the main interface, my Guitar, a Shure SM58 Microphone, and a fairly small MIDI keyboard, the LUMI Keys. I was listening on my Beyerdynamic DT 770 Pro 250 Ohm Headphones.
I thought it would be cool to have access to my guitar, in case I failed writing something on keyboard.
Also, my other Audio Interface is quite old, and has a shaky headphone jack, it kind of fell down a bunch of times, so I thought this was the best solution.
I was wrong.
Never again.
It was exhausting carrying all of that gear every day to and from the event.
I was curious and weighed my baggage after the game jam. I was carrying 27,8 kilograms. that is almost what an average soldier is carrying. It was almost as if I was walking around in Plate armour.
I will stick to my Lumi Keyboard next time, and just get a field recording device.
Lesson learned.
Writing the Music
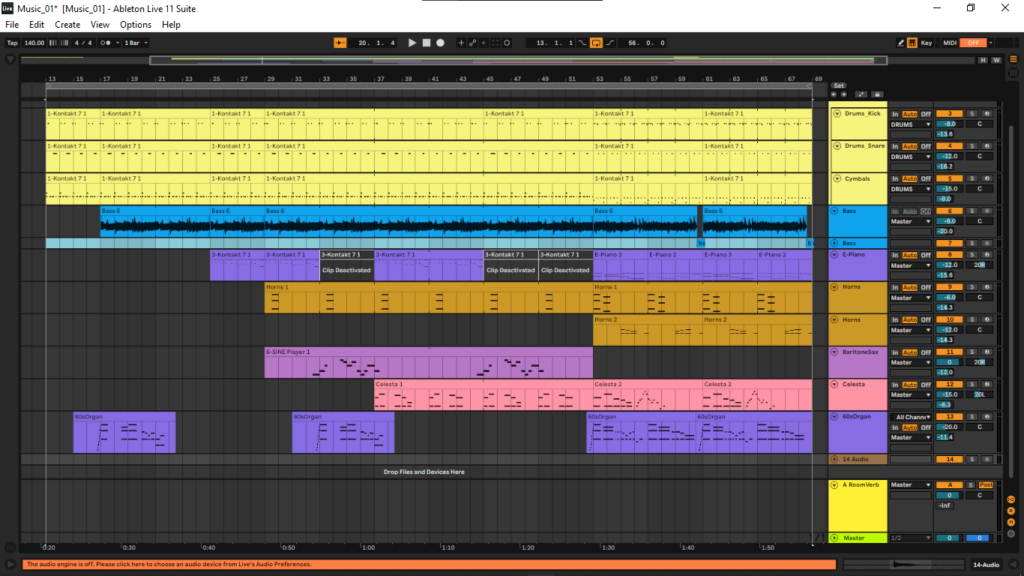
Anyway…
I used the following VST Instruments:
Native Instruments DrumLab
Kontakt Factory Library
Session Horns
Orchestral Tools Rotary (Baritone Sax)
Orchestral Tools Berlin Percussion (Celesta)
Kontakt Factory Selection Jazz Organ
I started with a fairly simple drum loop that I came up with quite fast. Just simple kick and snare. Then I added the cymbals to it, especially focusing on the ride, as it is a typically dominant cymbal in jazz. (And I also really like the sound of it!) It created that swinging effect I was looking for!
Whenever I write music for games, especially small loops, I always try to syncopate the drums, or even add polyrhythms. Basically, I try to shift the drumbeats, so that they appear almost as separate entities, as if they were playing different songs at the same time. 2D artists do the same thing in a parallax effect, when creating 2D Backgrounds. That way I can create shorter loops, but keep them interesting for far longer than I normally could.
I had my guitar, but no bass. and the music clearly needs a really cool bass line. So I selected my bass tone, then simply pitched my guitar down an octave, adjusted the knobs on the guitar to push more low end and went for it. Worked like a charm.
I pieced together a cool bass line after noodeling on my guitar for 10 minutes, and could proceed to write more layers. All of my concerns washed away at that point. I had a drum loop, and a cool bass line, which was the basis for the music. I was safe.
I felt the most relaxed while writing the music, and spent the least amount of time on that, because I knew what I was doing and just pushed through it.
I added different e-pianos, Jazz Organs, a baritone sax as well as a Celesta and Horns to the track.
All of which are commonly found in jazz fusion songs.
The Idea was again, to support that parallax feeling and adding the phrases separately from each other, after each other, and mix and match what was playing at the same time, so that the song contained different phrase combinations at all times.
the basic music was written in about an hour. I switched to working on creating soundeffects. Mixing music in a noisy environment is impossible, so I decided to mix it in my hotel room later. The Mixing took another hour or so.
Normally I use Sonarworks SoundID Reference as my mixing tool. It normalizes my headphone output, providing me with a neutral mixing environment. The problem with headphones, even professional studio headphones, is, that they have their own frequency response, and distort the audio they put out. My Beyerdynamic DT770 Pros for example cut out a bunch of mid frequencies, and add high end, as you can see in the image below. the violet graph represents my headphone output coloring.
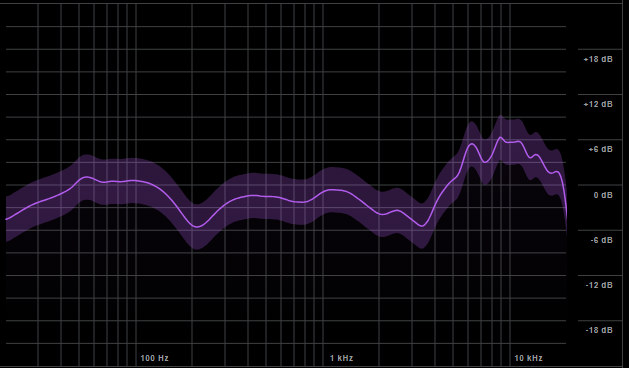
My Headphones are lying to me. this would directly translate to the mix. If I can barely hear the mid frequencies, I might boost them, although that would be wrong.
That’s why it’s so difficult to mix when starting out.
So Sonarworks fixes this, by inverting and applying the frequency response curve as an EQ, making it as close to a flat line as possible:
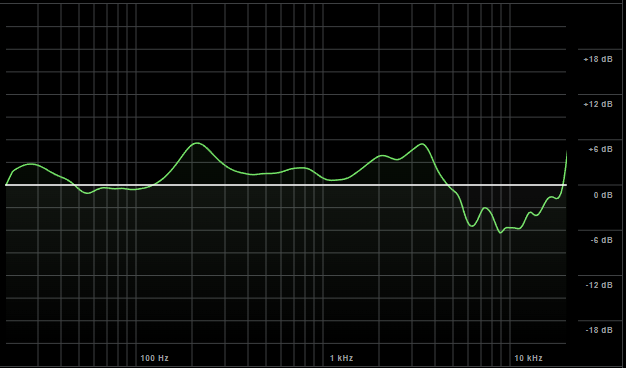
For some reason, I just could not get it to work on my laptop. not the new verison, and also not the old version. So I had to mix without it. It worked out in the end though. I checked with a different set of headphones (simple in-Ears I use for tracking stuff), and also, the system wide version worked for some reason. So I could at least check the rendered version of the song, but not the Song in the DAW editor which was annoying…
Mixing the Music
I generally apply saturation to almost every individual track, and might cut the extreme low end to reduce inaudible bass build up, and/or boost the high end to make the instruments a bit brighter.
I wanted to mention two specific things: I like to use dynamic EQ and Mix in Mid/Side mode.
I add an Envelope follower to the Kick drum. It tracks and reacts to the volume changes on the kick drum, and I can then connect the Envelope Follower to any parameter in Ableton. I look up what Frequency the Kick is prominent in, and assign that Frequency to the Bass Guitar EQ. From the Screenshot below, it is quite clear that the most prominent Frequency for the Kick Drum is about 60 Hz.
So now, whenever the Kick drum plays, the Bass makes room for it at 60 Hz, in that frequency range. But, when the Kick is not playing, the Bass can occupy that space.
Here is a screenshot of my Kick drum effect chain. the Transient master adds attack and reduces the sustain, the first EQ simply reduces the mid frequencies as they are not needed. and there is the Envelope Follower on the end there. I also dynamically EQed the Snare to duck other instruments in the same way.

Drumlab unfortunately is quite inflexible when it comes to routing out the drums separately. so I created three Instances of the plugin, and muted the midi notes, so I would get three different separated channels in the end: Kick, Snare, and Cymbals. (Ride, hi-Hat, crashes, etc.)
Then the mixing was fairly easy from that point on. I changed the snare samples a bunch of times, because the snare sound is extremely important, but it’s also a huge waste of time sometimes looking for alternatives. I picked the most acceptable sound I found.
I also like to use Mid/Side EQ, as I said. So here is an example:
I wanted to keep the 60s Jazz Organ panned to the center, but I wanted to keep the center frequencies open for other things like the Sax, Horns, or the Celesta. I wanted to focus the Organ to the sides, without panning it. here is where Mid/Side EQ comes in.

The Blue EQ Curve represents the Mid EQ, the gray one the Side EQ. (it’s only gray because it’s currently not selected for editing, it would be orange otherwise)
as you can see, I cut the low end everywhere, and cut out the high end in the middle, while boosting the high end in the sides. This is a great way to further separate instruments from each other, EQ panned Instruments more accurately and overall create clarity. As a general rule: the more bass frequencies an instrument has, the more mono it should be, so the less side frequencies it should have.
(don’t forget that rules are there to be broken though! I encourage experimentation!)
Because I only used a couple instruments, and because they are mostly playing after each other, AND because I wrote them in different octaves, respecting their frequency ranges, there was barely any mixing needed. I just adjusted volumes, added Saturation, and some dynamic stuff and was done with it.
Writing the Music 2
After mixing the first part of the song, I decided to quickly write a second bass line and drum loop that was going harder, and faster. We all wanted to have a phase where the music would increase in intensity. I spent a good 30 minutes writing the bass line, and when that was done, I switched to recording characters. I decided that the best option was to finish writing the song on location, and just use the instruments I already have, so I don’t have to mix again. And it worked well.
I finished the second half of the song and inplemented it in fmod on location.
FMOD Implementation
This was the first time that I worked in FMOD. I had some experience using Wwise a couple years ago.
I initially just imported the music into FMOD, put it in a timeline, created two separate looping sections, and added transitions after each phrase, so that the song could transition into the fast paced part as soon as possible. I am sure there is a smarter way of doing this, but, it needs to work as soon as possible in a game jam, not be editable or smart. so I did this:
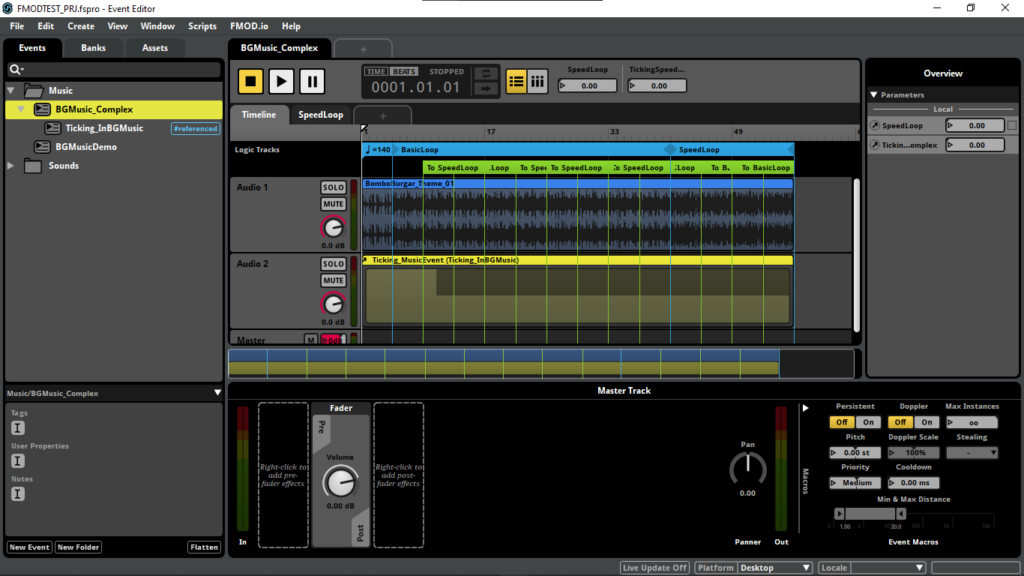
There is also another track that is a looping ticking sound. It was planned to represent the clock, but I did not implement it in the end. It was working in FMOD though! the TickingSpeed Parameter controlled it perfectly. The ticking would start from silence, and increase in tempo. there were 5 different speeds set up to loop, and one parameter that controlled the ranges. at the end stage, it would check if the value was below the highest possible value, and would reset the whole loop again to silence.
Sound Design
Sound Design was quite tricky for me, and I knew immediately that I would spend a lot more time on that, than on actually writing or mixing the music.
I had multiple problems. I rarely made sounds for games, as I focus mainly on music.
The Environment was very loud and noisy, so recording sounds at the event was out of the question.
I did not have a field recorder, so I was bound to my laptop
I did have my SM58 Microphone with me, so I could at least try and record in the hotel room.
But even there I had limited options.
The room was obviously not sonically treated in any way, so I had to find spots where the sound was not reflecting terribly from the walls
I was only sleeping in the Hotel room, so I had limited time windows where I could even attempt to record something, and it could not have been too loud during the nights because of other guests, so I had to really plan ahead on what and when I could record stuff.
I was limited by what was available to me in the room, or what I had with me
The very first thing I recorded was slapping cheese, bread and chicken onto the table. Ultimatively I did not use any of the sounds in the project, and I suspected that it was a fruitless endeavor, but did it anyway, maybe just for a laugh.
User Input / Buttons
The User Input sound needed to be very satisfying, punchy or clicky, distinct, but also at the same time it had to not be annoying after a while.
I knew that I could get really amazing and satisfying soft clicking sounds from Jarlids. By pressing jar lids, and pushing them, you can get really snappy and soft button press sounds.
Unfortunately I did not have a Jar, or a jar lid.
But I had a plastic water bottle. I scrunched it up, until the dented structure was quite rigid, then found a spot that sounded fairly satisfying. The concept stayed the same though:
it was a large surface area that was tensed up, just like a drum head, and I pressed in the middle, forcing it to bend.
Character Entry and Exit
This is a subtle sound, it’s the least audible of them all.
both sounds are made by using drum hits to simulate footsteps. I automated them to be panned from left to center, and from center to left, mimicing the entry and exit behaviour of the Customers.
Another solution would have been to add the basic step sound as a 3D Audio Source to the customer asset, and make it play when they spawn. this would sound somewhat the same then.
I also added bells to the entry, implying an opened door with chimes at the top.
Burger Success and Burger Fail Sounds
These two sounds are completely based on stereotypes, expectations, and the background music and are created by using instruments.
for the Success sound, I used an upwards playing harp, and the same session horns I used for the music, that also end up playing up. the upwards motion of the instruments implies success.
It is also adjusted to fit the music. The Song is in A, and uses a pentatonic blues scale.
so the notes chosen reflect that.
The Fail sound used the same harp, descending downwards, Session Horns that also end up bending down, and a synth created using the Massive VST, that plays two simple Saw Waves, with a chorus effect on it, to soften the sound a bit.
the descending harp and bending horns imply failure.
Character Vocals
This was the most time consuming and difficult task, and it didn’t turn out as initially planned, although I think it’s for the better.
The immediate idea was to make them speak like in animal crossing: just these kind of nonsense, fast-forwarded phrases. I decided to record different voices for each character myself, then edit them with pitch and chorus effects. I am glad that I am comfortable with doing silly voices, I got a lot of practice being a game master for tabletop games, and had a bunch of ideas to work with.
Then I got the Idea that we could actually make the customers convey important information! We already had recipes for the burgers, and I thought, maybe I could record specific syllables for each ingredient, add them to the recipe, and make the customer actually spell out what kind of burger they wanted.
obviously this would not be clear initially to the user, but maybe that would become obvious later on.
Initially I looked up the Katakana syllable alphabet, and recorded different voices using each syllable separately. I recorded up to eight different voices. I knew we would have 6 Customers, but we only had two at that time, and I didn’t know what to expect, So I recorded more voices, so we could choose what to use.
Here are two examples of voices for the Frog and Mouse. The first part is the raw recording, and the second part is the final processed sound:
Frog:

Mouse:

all of the voices are pitch shifted, frequency shifted, and have chorus effects or even phasers on them.
I also tended to add an Overdrive pedal to fix the problem with downpitching a sound. it looses frequency data in the high end. By distoring the sound, it regains high frequency data, and it sounds a bit more natural. Then I separated all of the syllables, exported them one by one, and imported them into FMOD.
I abandoned the Initial plan of assigning each syllable to each ingredient to save time. I decided to play a random syllable for each ingredient in the recipe, so at least they would accurately represent the number of ingredients.
I made a Timeline, that contained up to 11 Instances of a MultiInstrument, and a property that would stop the timeline if enough ingredients were played.
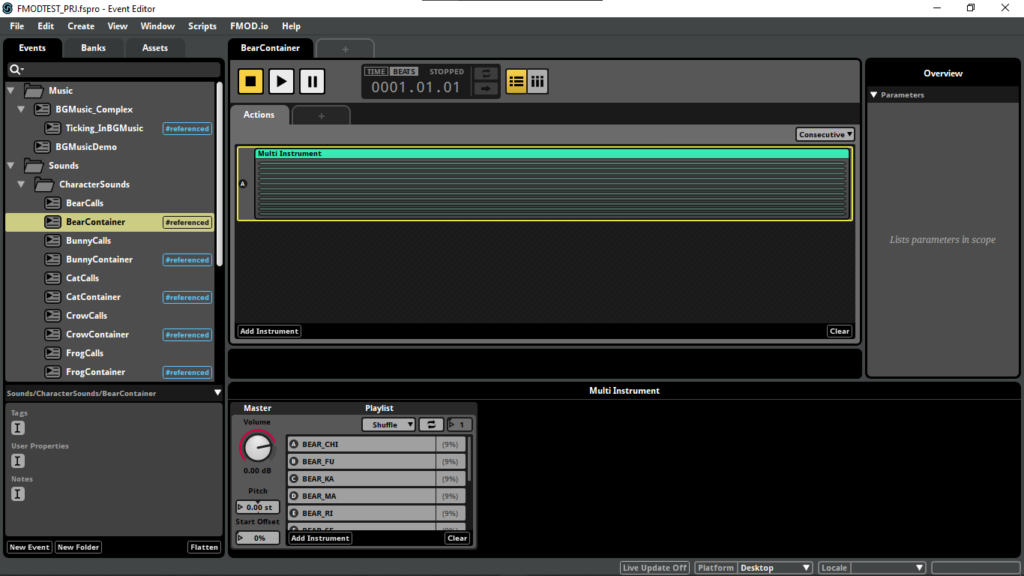
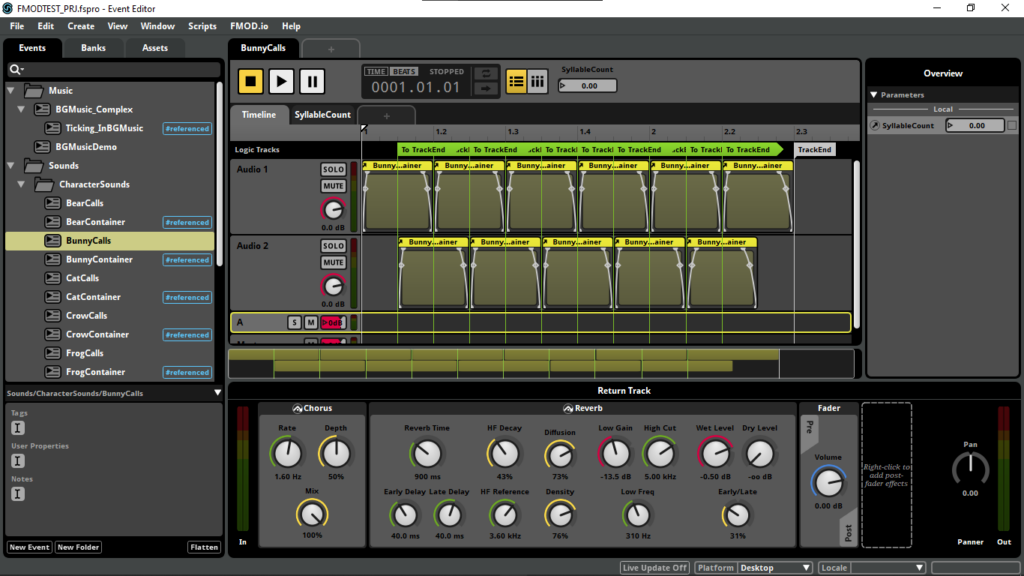
I expected this to be incredibly time consuming, but, luckily, I managed to save a lot of time thanks to FMOD. By duplicating the MultiInstrument and the Timeline, I managed to keep the reference in tact, so I only had to switch out the syllables in the multiInstrument and all of it worked properly. I also added a send effect and a reverb, so each syllable change would be masked by the reverb a bit.
Unfortunately I could not manage to set the Property correctly in the game, or, the timeline was simply not playing long enough.
The Characters only spoke one random syllable whenever they appeared.
We were already close to the end of the gamejam, and we still had to test if the build of the game worked, especially with WebGL and FMOD, So I decided to just leave it as it was.
I felt that a single syllable actually felt totally fine, like a greeting. One small little accident.
We had a small issue with FMOD not loading the AudioBanks on WebGL, but could fix that by using a custom script, that was loading the banks in the background properly.
Final Thoughts
This Game Jam was costly for me. I had to spend a ton of money travelling to Hamburg, spending the Nights at hotels, food costs, etc.
It was physically demanding, carrying all that gear with me (which I will never ever do again)
and also, mentally, obviously. I barely slept 4 hours each night.
It was worth it though. We won in every category, and I am really proud of this game.
It looks great, nothing sticks out negatively, it sounds decent, the game works as intended, there are no major bugs, and, it’s actually fun, which is not a given.
The Reception online is also insane!
A japanese website shared the game,
https://twitter.com/gamespark/status/1795085353252188235
the tweet got almost 2000 likes, and over 500 shares! A bunch of VTubers from Japan even streamed the game!
it’s really surreal!